How To Clean Shark Lift-Away Vacuum? | A Step-By-Step Guide
Claim your $100 Walmart Gift Card now and start shopping smarter! Limited time offer – act fast! Get a $100 Walmart Gift Card!
Keeping your home tidy is essential for a healthy living environment, and a well-maintained vacuum cleaner plays a vital role in achieving that goal. The Shark Lift-Away Vacuum is popular among homeowners due to its powerful suction and versatile cleaning capabilities. Regular cleaning and maintenance are necessary to ensure optimal performance and longevity of your Shark Lift-Away Vacuum. In this blog, we will guide you through the step-by-step process of cleaning your Shark Lift-Away Vacuum, helping you keep it in top-notch condition for years to come.
Step 1: Preparing for Cleaning
Before diving into the cleaning process, gathering the necessary tools and materials is important.
You will need
Clean, dry microfiber cloths
Mild detergent or cleaning solution
Water
Scissors
Step 2: Emptying the Dust Cup
The first step in cleaning your Shark Lift-Away Vacuum is to empty the dust cup. Follow these simple steps:
- Locate the dust cup in your Vacuum. It is typically located at the front or top of the main body. If you’re going to clean shark lift-away upright models, then you’ll find the canister at the front of the Vacuum.
- Press the release latch or button to detach the dust cup from the Vacuum.
- Take the dust cup to a trash bin and press the bottom release button to empty the contents.
- Tap the dust cup gently to remove any trapped debris.
- Rinse the dust cup with water to remove any stubborn dirt or residue.
- Make sure to dry it thoroughly before reattaching it to the Vacuum.
Step 3: Cleaning the Filters
The Shark Lift-Away Vacuum has multiple filters that require regular cleaning to maintain optimal performance.
Here’s how to clean the filters:
Check the user manual to locate the filters in your specific model. Typically, there are foam and felt filters, as well as a HEPA filter.
Remove the foam and felt filters from their compartments.
Rinse the filters under lukewarm water to remove dirt and debris.
Gently squeeze the filters to dislodge any trapped particles.
If the filters are filthy, you can wash them with a mild detergent or cleaning solution. Be sure to rinse them thoroughly afterward.
Allow the filters to air dry thoroughly before reinstalling them. It’s essential to ensure they are completely dry to prevent any mold or mildew growth.
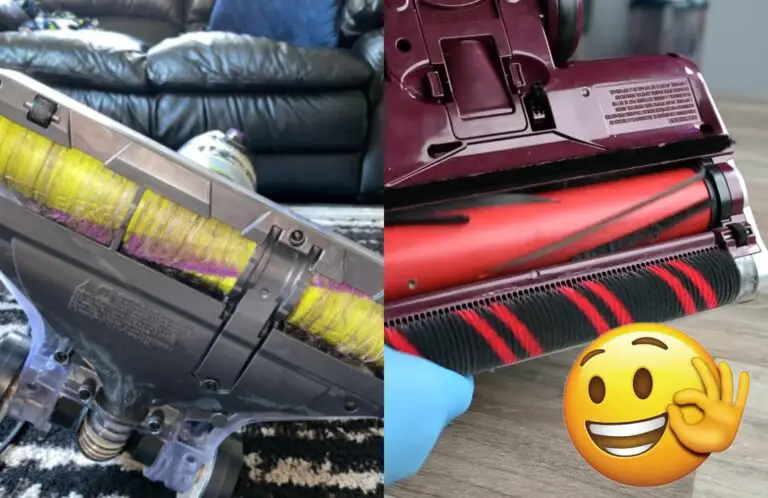
Step 4: Cleaning the Brushroll and Nozzle
The brush roll and nozzle of your Shark Lift-Away Vacuum can accumulate hair, threads, and other debris over time. Cleaning them regularly that will help you to maintain optimal suction and prevent clogs.
Follow these steps:
Turn off and unplug the Vacuum.
Use scissors or a seam ripper to carefully cut away any hair or fibers tangled around the brush roll. Be cautious not to damage the bristles.
Remove the brush roll cover or access panel to access the brush roll and nozzle.
Clean the brush roll and nozzle using a clean, dry cloth or brush to remove any debris.
If the brush roll or nozzle is particularly dirty, you can wash them with mild detergent and water. Make sure they are completely dry before reassembling. Or if the brush roller got damaged, you may change it to restore it.
Step 5: Wiping Down the Vacuum
To maintain the overall cleanliness of your Shark Lift-Away Vacuum, it’s important to regularly wipe down the exterior surfaces.
Here’s what you should do:
Use a clean, dry microfiber cloth to wipe the main body, handle, and attachments.
You can dampen the cloth with mild soapy water and gently wipe the affected areas for stubborn stains or residue.
Avoid using abrasive cleaners or solvents, which can damage the Vacuum’s finish.
Step 6: Checking for Blockages
Occasionally, blockages can occur in the hose, nozzle, or other parts of your Vacuum. If you notice a decrease in suction power or unusual sounds coming from the Vacuum, it’s important to check for and remove any blockages. Follow these steps:
Turn off and unplug the Vacuum.
Inspect the hose, nozzle, and other attachments for any visible blockages. Use a flashlight if necessary.
If you identify a blockage, carefully remove it using your fingers or a long, flexible object like a broom handle.
Avoid using sharp objects that could damage the Vacuum.
Once the blockage is removed, reconnect the hose, nozzle, and attachments securely.
Step 7: Maintaining the Power Brush (if applicable)
If your Shark Lift-Away Vacuum has a motorized power brush, it’s important to keep it clean for optimal performance.
Follow these steps to maintain the power brush:
Disconnect the power brush from the Vacuum, following the manufacturer’s instructions.
Remove any hair, threads, or debris tangled around the brush bristles using scissors or a seam ripper. Be careful not to damage the bristles.
Clean the brush and brush housing with a cloth or brush to remove any remaining debris.
Reattach the power brush to the Vacuum, ensuring it is securely in place.
Step 8: Routine Maintenance Tips
To keep your Shark Lift-Away Vacuum in excellent condition between cleanings, here are a few additional maintenance tips:
Replace the filters as recommended by the manufacturer. Over time, filters can become less effective, impacting the Vacuum’s performance.
Check the Vacuum’s brush roll regularly for wear and tear.
If the bristles are worn or damaged, consider replacing the brush roll to maintain optimal cleaning results.
Store the Vacuum in a clean, dry area away from direct sunlight and excessive heat or cold.
Follow the manufacturer’s instructions for any specific maintenance or troubleshooting guidelines for your model.
Step 9: Reassembling and Testing
Once you have completed the cleaning and maintenance steps, it’s time to reassemble your Vacuum and give it a test run. Follow these final steps:
Ensure that all the components, including the filters, brush roll, nozzle, and attachments, are completely dry.
Reattach the filters in their respective compartments, making sure they fit securely.
Place the brush roll back into its housing and secure the brush roll cover or access panel.
Reattach the dust cup to the Vacuum, ensuring it locks into place.
Plug in the Vacuum and turn it on to test its functionality. Listen for unusual sounds and check the suction power to ensure it works properly.
Step 10: Additional Tips for Enhanced Performance of your shark lift-away vacuum
To further enhance the performance and longevity of your Shark Lift-Away Vacuum, consider the following tips:
Regularly check the Vacuum’s brush roll for tangled hair or debris.
Removing any obstructions will help maintain optimal brush rotation and suction power.
Clean the Vacuum’s attachments, such as the crevice tool and upholstery brush, regularly to prevent the accumulation of dirt and debris. Use a cloth or brush to remove any visible particles.
If your Vacuum has a detachable canister, give it a thorough cleaning periodically. Empty the canister and wipe it down with a damp cloth to remove any dust or residue.
Next Read
How to get dog smell out of shark vacuum – Solutions Explained
Check the Vacuum’s hose for any blockages or kinks. Straighten out any kinks and remove any obstructions to ensure maximum airflow.
Consider using a vacuum cleaner deodorizer or placing a fabric freshener in the dust cup to keep your Vacuum smelling fresh and clean.
Store your Shark Lift-Away Vacuum in a safe and dry location when not in use. Protect it from excessive humidity, extreme temperatures, and physical damage.
By following these additional tips, you can maintain the performance and efficiency of your Shark Lift-Away Vacuum for an extended period.
Step 11: Seeking Professional Maintenance (if necessary)
While regular cleaning and maintenance can go a long way in keeping your Shark Lift-Away Vacuum in optimal condition, there may be instances where professional maintenance is required. If you experience any of the following issues, you should seek assistance from a qualified technician.
Persistent loss of suction:
If you notice a significant and continuous decrease in suction power, underlying issues may require professional attention. A technician can diagnose the problem and provide the necessary repairs.
Unusual noises or vibrations:
If your Vacuum emits strange noises or excessive vibrations during operation, it could indicate a mechanical problem that requires professional intervention. Continued use without addressing the issue may lead to further damage.
Electrical malfunctions:
If you encounter electrical issues such as frequent power interruptions, sparks, or abnormal heating, you must stop using the Vacuum immediately and consult a professional technician for repair.
Remember, attempting to repair electrical or mechanical issues yourself without proper knowledge and expertise can be dangerous and may void any warranty or service agreements you have.
Conclusion:
Regular cleaning and maintenance are key to keeping your Shark Lift-Away Vacuum in top condition. However, there may be situations where professional assistance is necessary to address specific issues. Feel free to contact a qualified technician if you encounter persistent loss of suction, unusual noises or vibrations, or electrical malfunctions. Their expertise and experience will ensure that your Vacuum is repaired effectively and safely. By combining regular maintenance with professional help when needed, you can enjoy the optimal performance and longevity of your Shark Lift-Away Vacuum for years to come. Happy cleaning!
Hi, Eddie T. Jones and I am the author of homegearsolution.com. I have been working with household appliances, tools, outdoor gear, and gardening tools for several years. I publish unbiased comparisons based on user reviews, expert reviews, and test results. I hope you like the website.
Best regards, Eddie T. Jones